Brian's "my wife isn't sure about this contraption" build
Re: Brian's "my wife isn't sure about this contraption" buil
![]() by bdring » Thu Sep 01, 2011 11:49 pm
by bdring » Thu Sep 01, 2011 11:49 pm
I suggest running at 1/8th step. That gets you 1000dpi. Steppers resonate and micro stepping helps. Did you disable CV yet?
Bart
"If you didn't build it, you will never own it."
"If you didn't build it, you will never own it."
- bdring
- Site Admin
- Posts: 2966
- Joined: Sun Nov 22, 2009 7:33 pm
- Location: Chicago, IL, USA
turned off CV
![]() by quadmasta » Fri Sep 02, 2011 12:31 am
by quadmasta » Fri Sep 02, 2011 12:31 am
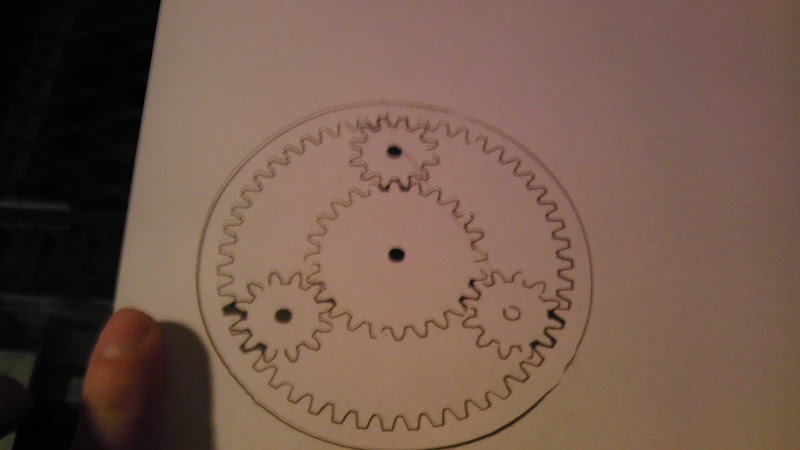
It's amazing what one little setting can do. Everything seems okay except that there's some bumps on the longer outer cuts that happen shortly after a direction change. Could this be caused by an idler that's not 100% in the middle of its axis? You can see this at about 1, 5, and 7 o'clock in the image. This is with the dust collector and air assist going. I'm not concerned about the laser firing during the rapid as I'd never cut these all at once if I were actually using them.
Here's a video of an air cut. It makes really funny "music" that you can't hear with the air pump on.
I'm reminded again of the bug on my phone that if I upload a video to youtube with the media volume muted, it mutes my video. Hooray!
- quadmasta
- Posts: 135
- Joined: Mon Apr 18, 2011 3:01 pm
adjustment question
![]() by quadmasta » Sat Sep 03, 2011 8:12 pm
by quadmasta » Sat Sep 03, 2011 8:12 pm
I'm getting much better results now than I was before. I re-squared the gantry and tightened everything up.
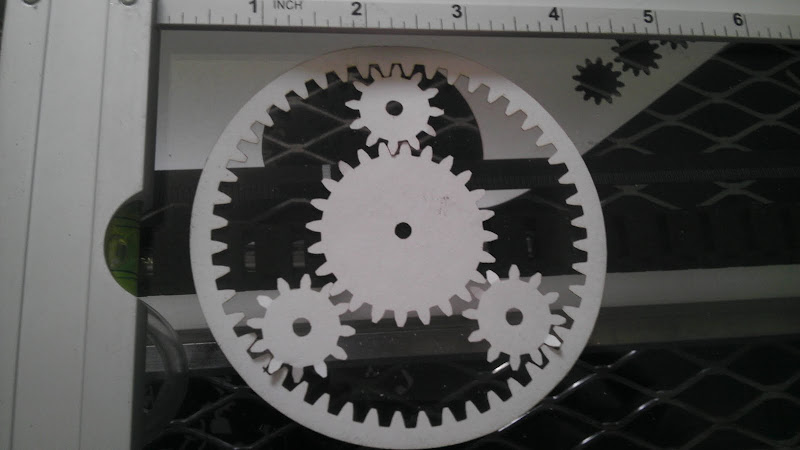
I'm still getting some inconsistencies in some of the cuts. The large ring laser's inner tooth cut has about 1/16th" of overlap. You can see it in the image above in the bottom left corner where the teeth of the planet gear are meshing with it. What's the best thing to cut/engrave to measure for adjustments? Using the test cuts, how do I determine where the innacuracies may be coming from?
I'm still getting some inconsistencies in some of the cuts. The large ring laser's inner tooth cut has about 1/16th" of overlap. You can see it in the image above in the bottom left corner where the teeth of the planet gear are meshing with it. What's the best thing to cut/engrave to measure for adjustments? Using the test cuts, how do I determine where the innacuracies may be coming from?
- quadmasta
- Posts: 135
- Joined: Mon Apr 18, 2011 3:01 pm
Re: Brian's "my wife isn't sure about this contraption" buil
![]() by bdring » Sat Sep 03, 2011 8:41 pm
by bdring » Sat Sep 03, 2011 8:41 pm
Here are a few suggestions.
Try working with simpler shapes. Draw a 4" square. See if it returns to the origin. See if the lengths are right. Check the corner to corner distance. Try various speeds and accelerations. Check for backlash.
Try working with simpler shapes. Draw a 4" square. See if it returns to the origin. See if the lengths are right. Check the corner to corner distance. Try various speeds and accelerations. Check for backlash.
Bart
"If you didn't build it, you will never own it."
"If you didn't build it, you will never own it."
- bdring
- Site Admin
- Posts: 2966
- Joined: Sun Nov 22, 2009 7:33 pm
- Location: Chicago, IL, USA
clarification
![]() by quadmasta » Sat Sep 03, 2011 8:45 pm
by quadmasta » Sat Sep 03, 2011 8:45 pm
When you say try various speeds and acceleration values do you mean in the motor tuning?
How should I check for backlash? pulse the laser go an inch, pulse the laser go back an inch and pulse the laser and if the laser's not in the same hole, I've got backlash?
How should I check for backlash? pulse the laser go an inch, pulse the laser go back an inch and pulse the laser and if the laser's not in the same hole, I've got backlash?
- quadmasta
- Posts: 135
- Joined: Mon Apr 18, 2011 3:01 pm
Reverse progress!
![]() by quadmasta » Sun Sep 11, 2011 6:03 pm
by quadmasta » Sun Sep 11, 2011 6:03 pm
So after reading Ben's comment on another user's blog regarding the perpendicularity of the beam exiting the final mirror, I checked my gantry for square. Fail. The extrusion of the gantry isn't square to the end plate. Worse than this is there's no way to adjust it without taking EVERYTHING apart. This along with Awesomenesser's pictures made me realize that this 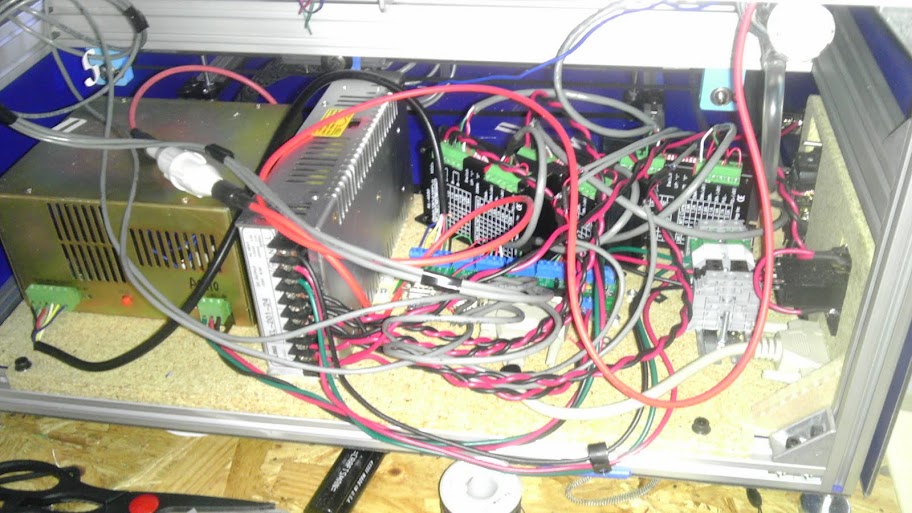 needed to be addressed.
I made an order from McMaster, Mouser, a few different eBay members and Bart. I have plenty of parts inbound and my cutter is now almost completely disassembled. I'm replacing the Y axis drive with more purpose-built motor couplers and precision ground drill rod. I'm replacing the idlers with Bart's smooth idler kit. I'm adding lighting because I didn't realize it was such a cave. I'm also ordering more post-assembly nuts and slot covers from Misumi.
Once it's back in action, it should be a lot more accurate and a lot more clean looking. If Bart starts shipping Kickstarter rewards soon enough, I may replace the Y rails with MakerSlide. Most of the stuff I ordered for upgrades is coming from China so my blog won't see much action for a while.
needed to be addressed.I made an order from McMaster, Mouser, a few different eBay members and Bart. I have plenty of parts inbound and my cutter is now almost completely disassembled. I'm replacing the Y axis drive with more purpose-built motor couplers and precision ground drill rod. I'm replacing the idlers with Bart's smooth idler kit. I'm adding lighting because I didn't realize it was such a cave. I'm also ordering more post-assembly nuts and slot covers from Misumi.
Once it's back in action, it should be a lot more accurate and a lot more clean looking. If Bart starts shipping Kickstarter rewards soon enough, I may replace the Y rails with MakerSlide. Most of the stuff I ordered for upgrades is coming from China so my blog won't see much action for a while.
- quadmasta
- Posts: 135
- Joined: Mon Apr 18, 2011 3:01 pm
layout possibility
![]() by quadmasta » Sun Sep 11, 2011 8:04 pm
by quadmasta » Sun Sep 11, 2011 8:04 pm

from left to right top to bottom
24V PSU
12VPSU
Z driver
X driver
Y driver
120V solid state relay (air pump)
120V solid state relay (fume extractor)
long skinny control board with space blocked out for DB9 and DB25 connector
DIN rail
I moved the laser power supply to the front of the frame like awesomenesser so I don't have to worry about it on the module. I may have to slide everything toward the rear so installing/removing the module will be easier.
- quadmasta
- Posts: 135
- Joined: Mon Apr 18, 2011 3:01 pm
Re: Brian's "my wife isn't sure about this contraption" buil
![]() by quadmasta » Thu Sep 15, 2011 11:55 pm
by quadmasta » Thu Sep 15, 2011 11:55 pm
So far, everything is progressing way better than last time.

I just now realized that I'll have to move the 24VDC wires to the other side of the 12V PSU once I get it. Oh well, there's only 2 wire holders on that part.
I just now realized that I'll have to move the 24VDC wires to the other side of the 12V PSU once I get it. Oh well, there's only 2 wire holders on that part.
- quadmasta
- Posts: 135
- Joined: Mon Apr 18, 2011 3:01 pm
limit switch wiring
![]() by quadmasta » Thu Oct 20, 2011 11:26 pm
by quadmasta » Thu Oct 20, 2011 11:26 pm
Because of the wires I ran to the laser carriage for 3.3V for the laser pointers/line generators my big carrier is kind of full. If I put both switches back on the gantry, can I run both switches off of one set of wires if I bridge one switch to the other? I've got a 3-wire twist running to the gantry and could probably get another one through but it'd likely take forever so I'm trying to avoid it.
- quadmasta
- Posts: 135
- Joined: Mon Apr 18, 2011 3:01 pm
Re: Brian's "my wife isn't sure about this contraption" buil
![]() by BenJackson » Thu Oct 20, 2011 11:42 pm
by BenJackson » Thu Oct 20, 2011 11:42 pm
Two of the switch connections are already common (GND) so you just need to run that common line to each switch and use the other two wires for the signals.
I know that some setups can deal with ganged home switches but I think it's worth the extra wire to be able to home simultaneously.
You could also look into mounting the Y limit on the frame (if you're willing to make your own bracket)
I know that some setups can deal with ganged home switches but I think it's worth the extra wire to be able to home simultaneously.
You could also look into mounting the Y limit on the frame (if you're willing to make your own bracket)
- BenJackson
- Posts: 522
- Joined: Fri Apr 15, 2011 6:13 pm
Who is online
Users browsing this forum: No registered users and 50 guests